Instructions for Personnel Transactions
Hiring, rehiring, changes, and termination of student employees
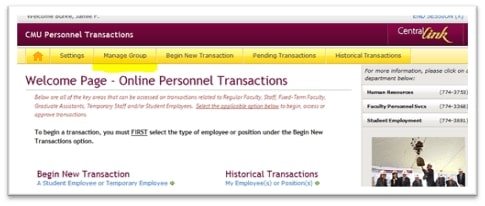
Navigate to CentralLink. Under My Work Day click Personnel Transactions. You will then see the Welcome Page.
Under Begin New Transactions, choose: A Student Employee or Temporary Employee.

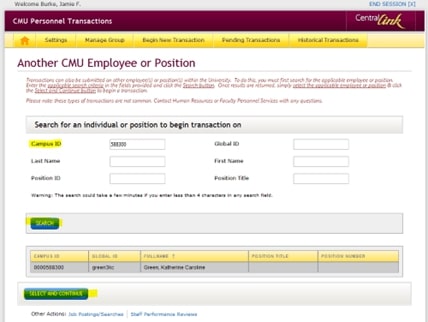
On the screen “Another CMU Employee or Position” under Search for an individual or position to begin transaction on, select a student by entering the Campus ID Number. If the number is unknown, search by Last Name and First Name. The fewer search fields completed, the better the results. Click ‘Search.’ Then click the name of the student that pops up, turning the name gray, and click SELECT AND CONTINUE.
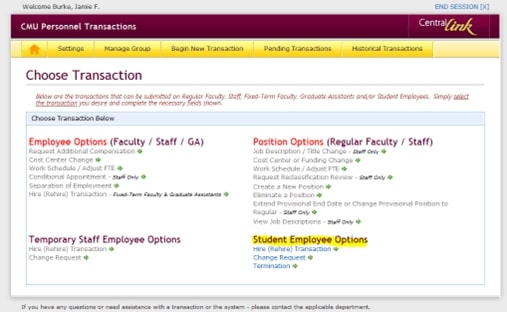
On the Choose Transaction screen, under Student Employee Options, click on the form needed: Hire (Rehire) Transaction, Change Request, or Termination.
After you have hired a student the first time, fields pre-populate. Your forms begin to remember you! You may also tab field-to-field for ease of completion.
Below are further instructions for each specific transaction.
Jump to:
- HIRE/REHIRE TRANSACTION
- CHANGE REQUEST
- TERMINATION
- NOTIFICATION SETTINGS and MANAGE GROUP (CMU Dining only)
Hire/Rehire Transactions
The name of the student you selected pre-populates. If this is a student’s first job on campus, the Position field is blank, and the Position ID reads TBD. If a student worked elsewhere prior to this transaction, you will see that information. These fields are informational only. They do not affect your hiring transaction.

Complete the following fields. Required fields have an asterisk.
- Division: Select the university division under which your department falls.
- *Home Department: Choose from the alphabetized list. Key the first letter to jump quickly.
- *Student’s Supervisor: Name of the person to whom the student answers.
- *Contact Name/Number: Name, if different from Supervisor, and the four digit CMU extension
- *Does this student have…: In most cases, answer ‘NO.’ If yes, please contact SES.
- *Is this student a hire for…CMU Dining: NO is the default. Only answer YES if you represent a ResLife, AuxSvs, or CMU Dining location.
- *Hiring Period: The semester in which the student works.
- *Type of Award Desired: GSA (if paying from a dept budget, grant, or CMU GSA funds); WORK-STUDY if hiring an eligible student.
NOTE: When requesting Work-Study, an additional required question pops up: "If student is NOT eligible for Work-Study, do you want to hire them as GSA?" If YES, please provide both Cost Center numbers.
- *Projected Amount: This is your anticipated Work-Study budget for the student. Although a required field, for GSA hires a zero can be used.

- *Student Level: S1-S3, according to the Student Employee Classification System found in the Handbook for Supervisors.
- *Job Title: Examples include but are not limited to Student Assistant, Food Service Worker, FSW, or Team Member/Leader
- *Rate of Pay: Type in the wage; no dollar sign necessary. The formatting is automatic.
- Internal Order #: To assist with tracking special payments. (This is not used by CMU Dining.)
- *Task #: Your area’s job code used by the student when clocking in and out.
- WBS Element #: Used only if paying the student with a grant. Additional approval by ORSP is required. (This is not used by CMU Dining.)
- Cost Center # and GSA Cost Center #: Your department’s five-digit code used for paying students. If your department can pay GSA but prefers WS, please enter both cost center numbers.
- *Appointment Begin Date: The begin date of the Pay Period in which the student is expected to start work. This is always a Sunday for Payroll purposes. This may be entered as MMDDYY. Please refer to and use Payroll's Hourly Employee Pay Schedule.
- *Appointment End Date: The last date of the Pay Period in which the student will work within the chosen semester. This is always a Saturday for Payroll purposes. This may be entered as MMDDYY. Please refer to and use Payroll's Hourly Employee Pay Schedule.
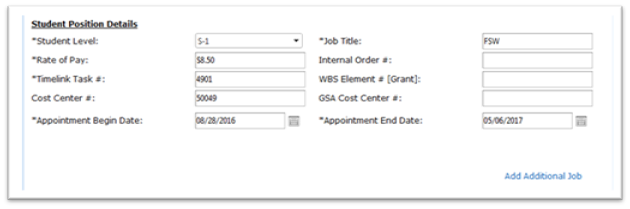
Add Additional Job: Click to add more than one hiring position within the same time period. For example, a student may work at Central Eats, Shake Smart, AND Starbucks within the same semester. You may hire all your locations and/or levels on one form within the same time period.
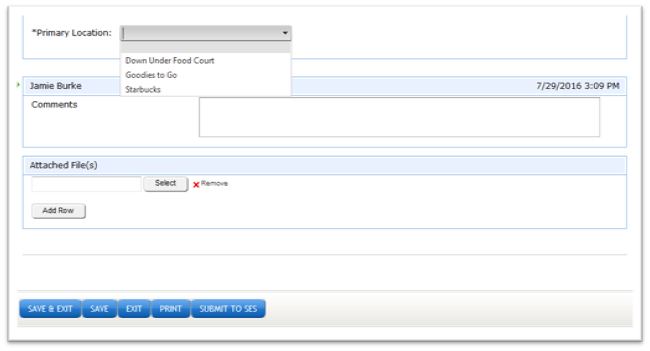
Primary Location: (CMU Dining only) Select the main dining location for this student. This assists you and SES with future searches and with TimeClock Plus approval. If you only have one location, it will pre-populate.
Comments: Add comments, if any. These remain permanent. Files may be attached, such as resumes, class schedules, or emailed requests for Work-Study, or approvals for unique wages.
When you have completed the form, click SUBMIT TO SES. Forms may be saved prior to submitting, to then be found in Pending Transactions.
Change forms are used for correcting errors, promoting a student from one position to another (without keeping the former), adjusting wages such as minimum wage increases, or switching Cost Centers.
Navigate through the selection screen and choose Change Request.
Again the student information populates. Choose your Division, Home Department, Student’s Supervisor and Name/Number like the Hire Form process above.
The Effective Begin Date is always a Sunday. If the change happens prior to the current Pay Period, answer YES to the question ‘Is change retroactive?’ Our office will then work with Payroll to process the appropriate accounting updates.
Important: Fill in both the CURRENT rate, cost center, or task code, and the NEW. Many students are hired for more than one position on campus and this communicates your needs precisely.
If the changes affect more than one position for the same student within the same time period, you make select ‘Add Additional Rows.’
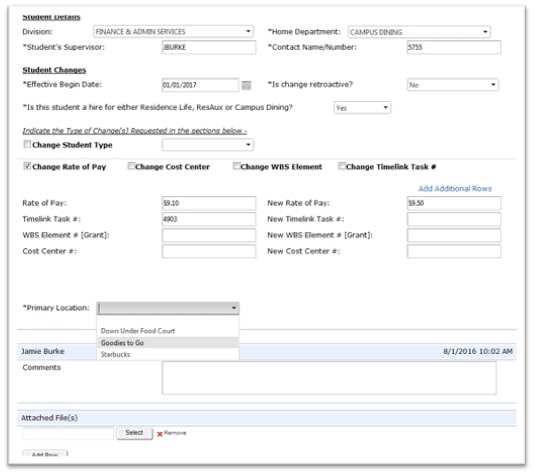
Select the student’s Primary Location (Campus Dining only), add comments/files, if any, and click SUBMIT TO SES.
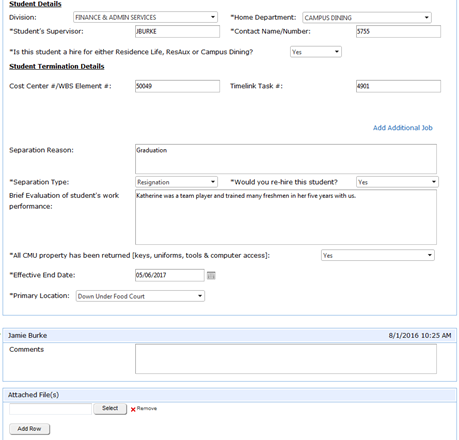
TERMINATION
Navigate through the selection screen and choose Termination.
The student info populates. Choose your Division, Home Department, Student’s Supervisor and Name/Number, like the Hire Form process above.
Add the Cost Center and Task number from which the student is being terminated. You may terminate the student from all locations over which you are responsible by selecting Add Additional Job.
Explain the Separation Reason: ie Graduation, NCNS, withdrawal
Select the Type: Resignation or Termination
Select the non-rehire status: Yes is the default. For CMU Dining: A ‘no’ response is communicated to all of Campus Dining. Please note in the Separation Reason why this response was selected.
Brief Evaluation: This is helpful information for employment verifications or the non-rehire of Dining students.
Select the Effective End Date, which is always a Saturday.
If you want to terminate the student from more than one position, select ‘Add Additional Job.’ Terminations from your office do not affect other departments on campus for which the student works.
Choose the Primary Location (CMU Dining only) in which the student worked.
Add additional comments for SES, if any, and attach necessary files, such as doctor's orders or a police report, and click SUBMIT TO SES.
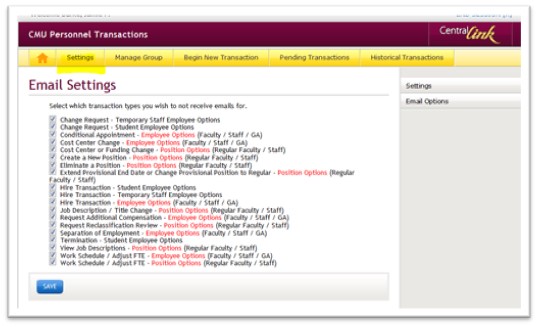
NOTIFICATION SETTINGS and MANAGE GROUP
NOTIFICATION SETTINGS: As forms move through the process, you may receive email notifications. To adjust these notifications, select the ‘Settings’ tab. Uncheck any you do not wish to receive, and click Save.
To see submitted forms, return to the Welcome Page. Under Pending Transactions click My Transactions. Under ‘Waiting For’ you’ll see where along the process your form is. If you have a large number of forms, you may scroll down and search for a specific form using the search options.
If you do not see the transaction in Pending Transactions, it means it has been processed by SES and is now under Historical Transactions. Click My Employee(s) or Positions(s) to see it. Over time, you’ll find the search option becomes a valuable tool.
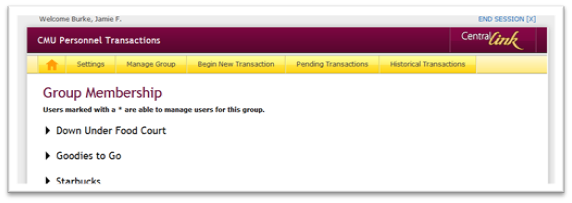
MANAGE GROUP (CMU Dining only): As Student Office Managers graduate, it becomes necessary to update users for your group(s). To review, change, or remove a user, on the Welcome Page click the Manage Group tab.
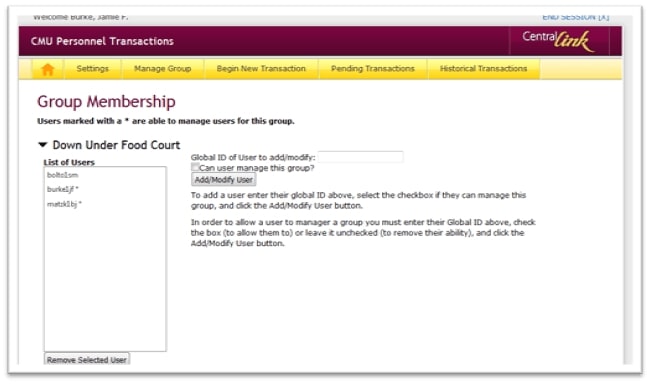
Click the arrow of the group you would like to edit:
In the example below, an * indicates a user with access to manage the group. To remove a user, click on the global ID turning it gray. Then click ‘Remove Selected User.’ To add a user, enter the Global ID in the field on the right, and click Add/Modify User. By clicking ‘Can user manage this group?’ you indicate a Chartwell's employee. Please keep the list of users to a minimum.
Contact SES with questions, ses@cmich.edu or call 989-774-7550.